

One of the most unique features of the platform Discord is its roles. Discord roles are assigned titles or ranks that you can give to members of your server. For example, you can assign the role "Admin" to set apart certain members as administrators in your server. From there, you can set certain permissions for the admin role to determine what functions admins can access on your server. You can do this for any number of members of your server for up to 250 roles.
In this article, we will go over how to add roles in Discord, how to set roles for members, and how to use a reaction role bot to simplify the process. Before we get into that, however, let's briefly touch on the reasons why you should use Discord roles in the first place.
Why Use Discord Roles?
Discord roles can help you get to know your server members, lock content behind certain channels, and reward backers. For each role, you can decide what permissions members of that role have, which in turn determines what functions they're allowed to perform on your server. This is a good way to protect your server so that only members you trust can make changes to it, or to keep new members' permissions limited until they've agreed to follow the server rules or have been otherwise verified.
You can also lock channels or channel categories behind certain roles. For example, if you want to make a channel that only your mod team can access to discuss server rules and changes, you can create a channel that only those with the "Moderator" role can access. This way your server's moderators can have conversations that are secret from the other members of the server.

You can also use this to lock channels for specific interest groups, demographics, or supporter levels. You can incentivize server members to donate to your Patreon, Kickstarter, or other platforms by making a "Supporter" role for such members and giving them access to supporter-only channels. Or you can create locked spaces for people with different interests or who want to look at specific content. With Discord roles, you can quickly customize your server and manage separate spaces for different members.
Finally, Discord roles provide a fun and easy way to get to know your server members better. You can set members' preferred pronouns, gender, hobbies, and more with roles. This can also help facilitate conversations in your server as members with similar interests have an easier time finding one another.
How to Make Roles in Discord

Making and assigning roles in Discord is an easy task. You can follow this step-by-step guide to learn how to make roles on Discord:
Click on the Discord server that you want to create roles for. Make sure that you have permission to make roles in the server. If you are the owner of the server, then you should; if not, you may or may not depending on your own role in the server and the owner's settings.
Click on the down arrow next to the server name and select "Server Settings"
Click on "Roles"
Select "Create Role"
Fill out the information for your new role. Choose the role name, color, and permissions, and select which members will have the role.
Click "Save Changes" at the bottom of your screen to save your new role.
Editing Discord Roles

You can also edit roles that have already been created. Go to the "Roles" tab in the same way as above. From there, you can click on the role to edit its name, color, and permissions, assign new members to the role, or view the server from the perspective of that role. The latter feature lets you check the permissions you have set for the role and make sure members with the given role can access all the parts of the server that you want them to. You can also toggle on and off whether role members are displayed separately from online members on the member list and whether other members can @mention all members of the role.
From this screen, you can also change the role's "level" in the server. Roles are listed from highest to lowest level. This level determines which role is the primary one for a given user, which in turn determines their name's color and title on your server. For example, if the top role in your server is "Admin" and the Admin color is yellow, then anyone with the Admin role will have their name displayed in the color yellow even if they are assigned other roles. Additionally, if role members are displayed separately from online members on your member list, the top role will server as each member's display title. So, even if members with the Admin role have other roles, they will be listed under the Admin title on your member list on the right side of your server.

Finally, you can also change the permissions set for the "everyone" role, which is the role that any member receives when they first enter your server. If you want to lock certain server functions behind certain roles, such as channel creation or the ability to mute other members, then you need to make sure that the @everyone's role permissions do not include those functions.
Using a Reaction Role Bot
If you have a large number of members and/or roles in your server, then it can be difficult to assign the right roles to each member. This is where a Discord reaction role bot can come in handy. With a reaction role bot, members can set their own roles by using emoji reacts on a post. All you have to do is create the role and the post; your members will set their own roles for you!
Each reaction role bot for Discord functions a bit differently. Nonetheless, they can all be used in generally the same way. Most reaction role bots will let you set up reaction roles from either your server or an online dashboard. During setup, you will choose an emoji reaction for each role that you want to create a reaction role for. You will also be able to write out directions for your members on the post so they know which react to use for which role. Once you publish your post, each emoji reaction will appear at the bottom of the post. Then, members simply have to click on the reaction to assign themselves the associated role.

If you're going to use a reaction role bot, then it's a good idea to create a separate Discord channel for roles where you will post all of your reaction roles. This way, new member can easily find these posts and assign themselves roles. This will also help make new reaction roles visible whenever you create them. If you want to notify all server members of a new reaction role, simply @everyone on the #roles text channel.
MEE6: The Best Discord Role Bot
Are you looking for a reaction role bot for your server? Then check out MEE6. MEE6 is already one of the top moderation bots for Discord-- you can use it to moderate content, warn users for infractions, and even play music. Nonetheless, on top of all these features, MEE6 is also one of the best Discord role bots. You can use MEE6 to set roles, create reaction roles, and assign automatic roles for new users.
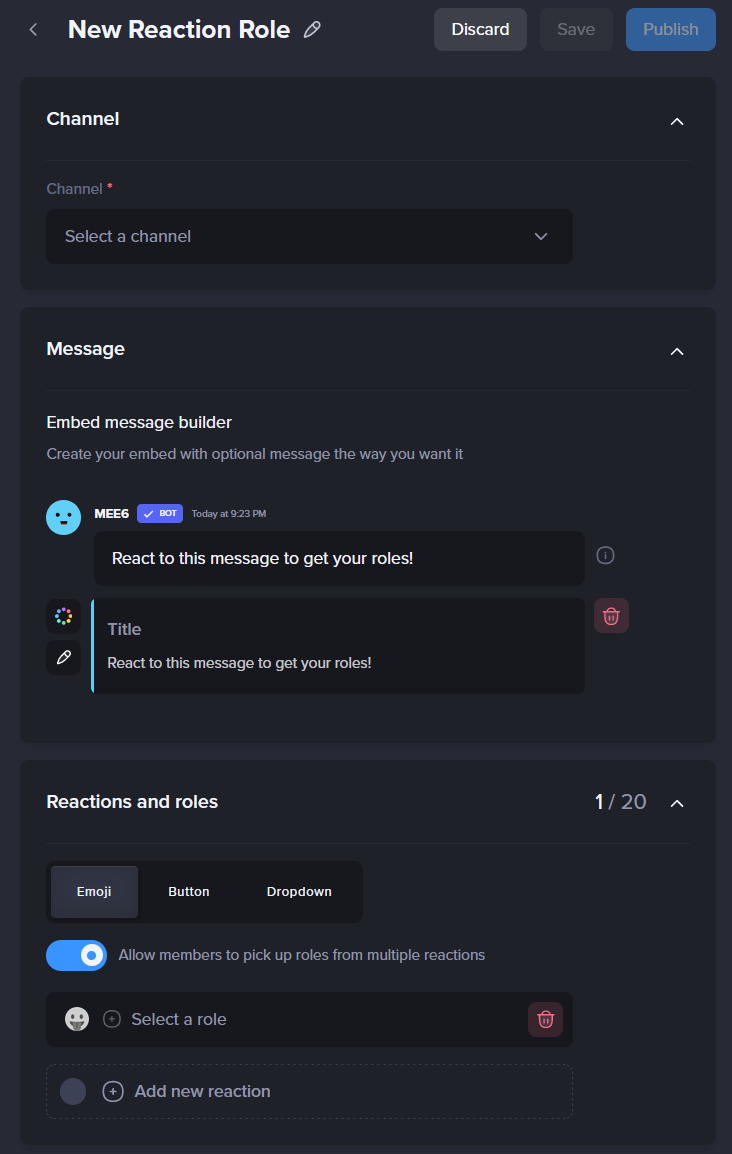
MEE6's free version allows you to preview the options that you have for reaction roles. With MEE6 Premium, however, you can access all features of Premium plugins, e.g. advanced custom commands (such as give/remove role) and create up to 40 reaction role messages with a maximum number of 20 reactions. MEE6 Premium begins at $11.99/month, though you can save by selecting a yearly plan ($49.99/year) or a lifetime plan (a one-time $89.99 purchase). For more information about MEE6 Premium and currently available discounts or promotions, check out our website. You can also download the free version of MEE6 here and start using the top-rated Discord moderation bot today.
Frequently Asked Questions - Reaction Roles Plugin
Can I make a verification system with Reaction Roles?
Yes, you are welcome to read this article we prepared especially for you: How to Use Reaction Roles as a Verification Gate for Your Community.
Can we use buttons instead of emojis to give out roles?
Certainly yes! Thanks to recent changes on Discord, we now offer three ways of using the Reaction Roles:
Emojis - Where the members will be able to get roles by clicking on the right reaction.
Buttons - Works similarly to the emojis, but gives more privacy since others can't see how many and who reacted to it.
Dropdown menu - An even fancier way to allow your members to select the roles they are after.
Is it possible to add more than one reaction per message?
The answer is yes. We allow our customers to add up to 20 unique reactions per message.
If you unlock premium, you will have up to 40 messages that allow you to add up to 20 reactions, giving you stunning 800 different combinations, all this to make sure MEE6 can suit your community needs.
Can I hide the Reaction Role message after a role has been given?
Yes, and you can do this by configuring the channel not to be visible to the given role.
Go to the channel settings, and head to the permissions tab.
Now, leave the everyone -> view channel in gray (/).
Next, simply add the role that was given out by the plugin and change the view channel to view channel (❌).
Note: Anyone with another role with the view channel permission granted (✅) will be able to see the channel, so the member must not have it.
If you have any issues with the plugin, do not hesitate to join our support server! ✌️